How to Use eCheck-in for Your Appointment:
Before Your Appointment
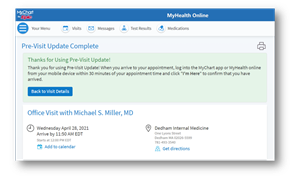
You can complete the pre-check in process on the day of your appointment. To do that, please follow these easy steps: Step #1. Log into your MyHealth Online account on your desktop computer or through the MyChart Mobile App on your phone. Step #2. Scroll down the main screen to find your appointment and select it. You can also go to “Visits” from the menu and find your upcoming appointment there. Step #3. Click on the eCheck-in link to complete your Pre-Visit Update and confirm we have current information about you and your insurance, medications, and any allergies. You will also be able to electronically sign any needed forms and pay any copays online. Make sure to check “This information is correct” at the end of each step to proceed to the next. Step #4. By answering the COVID-19 same day symptom questions ahead of your arrival at the practice, you will not need to spend additional time answering them in person. Step #5. After you’ve completed all the sections in the Pre-Visit Update, hit Submit. You know you’ve completed all the steps of the Pre-Visit Update successfully when you see the following screen.

When You Arrive for Your Appointment
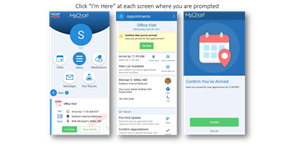
Step #1. Log into your account on the MyChart Mobile App and select the “I'm Here” prompt which will display on the home screen within 30 minutes before your appointment time. Want to set up geolocation services to receive a push notification when you’re close by? Complete a few simple steps in the MyChart mobile app. Note: If the geolocation doesn’t work for you, please manually log into your MyChart mobile app and select “I’m Here.”

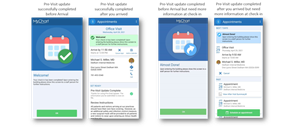
Step #2. If you successfully completed the Pre-Visit Update before you arrived for your appointment, the system will then display the green welcome message (left image). If you didn’t have a chance to start or couldn’t fully finish the Pre-Visit Update, the system will prompt you to complete it at this time. If you are able to successfully complete it, you will see the green Welcome screen (2nd image from left), but if we need some additional information, you will see one of the Almost Done blue screens (right-side 2 images), and we can identify what’s missing when you stop at the registration/check-in desk before heading to your appointment.

Step #3. Upon entering the building, please show the Welcome or Almost Done screen to the check-in staff, and you will be directed from there.


